

And our latest trip to Japan for two weeks, really did take a lot of planning. The language barrier, the sheer enormity of geography, navigating the multi-layered transport system, lugging baggage up and down platforms, and catching the speedy, illusive Shinkansen, weaving through human traffic, were challenges we looked forward to tackling as much as any intrepid traveller would.
In this post, we will add information to briefly introduce and share some tips on how to navigate Japan’s confusing transport system, and whether or not to get ‘connected’ with a personal mobile data plan whilst moving about. Great for travelers new to Japan.
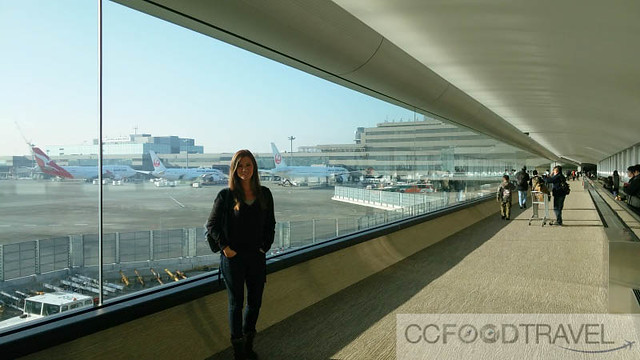
In the first week, the plan would be to visit, Osaka, Kyoto, Nagoya and Mt. Fuji, ending up in Tokyo for the Tokyo Marathon, 22 Feb 2014. And the second week would be spent exploring Tokyo. We only had a maximum of 2 days at each location to explore so time was a huge factor. Coupled with that, a lot of traveling and time was wasted waiting for transportation, getting lost here and there, and very often, we were distracted from our path by new attractions. We averaged being at least 8 hours on our feet a day discovering and getting lost in Japan. Good footwear with support is important.
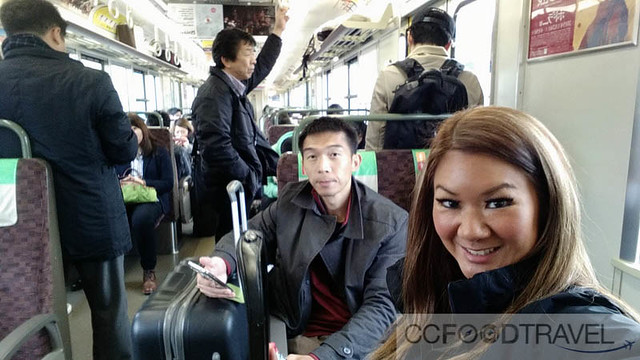
Arriving at Narita Airport, Tokyo, at the start of our 2 week travels in Japan, the first thing we had to do was to collect our pre-ordered WiFi hub from the post office, and our JR Passes from the JR ticketing office. WiFi to get connected. JR Passes to travel economically on the long distance railways including the Shinkansen bullet train.
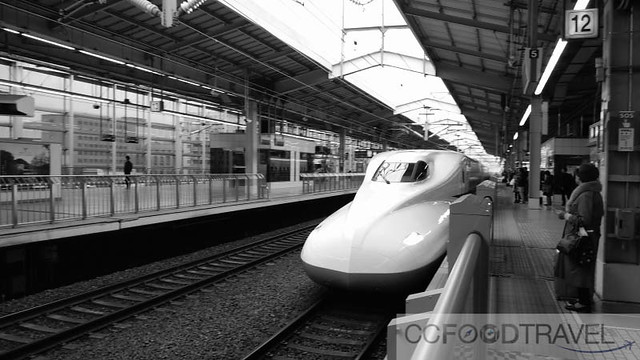
Our priority on the first day was to speed off by Shinkansen to Osaka. That journey itself was supposed to take 2 hours, so we had to be quick about things, if we wanted to arrive in Osaka in daylight. Japan is all about efficiency, precision and punctuality so we just needed to get to the right places at the right time to accomplish our destination goals.

Japan Rail Passes (JR Pass) are a range of very economical passes covering many city railways, national railways and bus routes operated by 6 companies under the Japan Railway Group. The 6 companies are divided by their railway regions e.g. JR East and JR Central. The JR Passes are available only to tourists, and Japanese nationals not living in Japan. The JR Passes can only be purchased at approved tour agencies outside of Japan, whether online or at the agency. Depending on which type of pass and duration, you will have unlimited travel within the designated coverage. Prices are standardized and fixed by the JR Group.
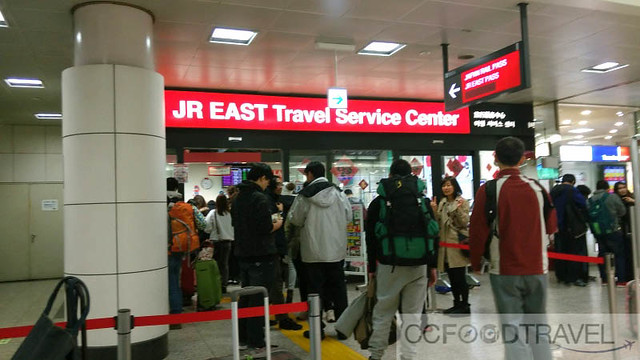
JR ticketing offices are found in all train stations. Above is the JR East (line) office at the basement of Narita Airport
For long distance rail travel, once you have your JR passes, you will need to physically step into a JR office at the railway station to book your seats for same day travel or another day. You will be issued tickets which will state your allocated seats, line number, and car /carriage number. There is no online reservation system.
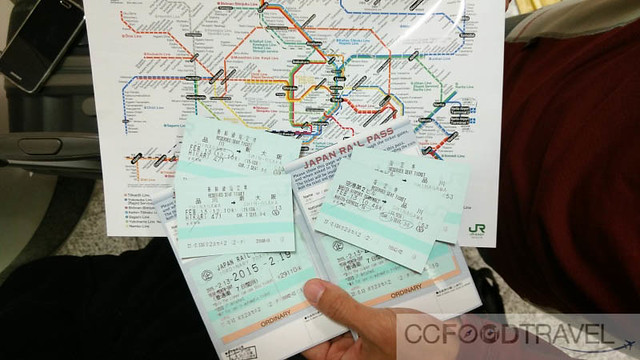
Top to Bottom: JR Railway Tokyo Map, JR tickets (Narita Express and Shinkansen to Osaka), and JR Passes
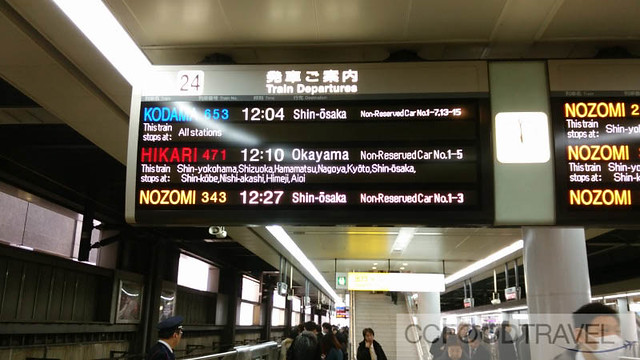
When we arrived at Narita Terminal 2, we had to get on the Narita Express train to Tokyo Station (1hr 20mins) and then catch the Shinkansen on another platform to Osaka. Narita Express is part of JR so if you have a JR Pass, there is no extra payment. We booked our Narita Express and Osaka bound shinkansen seats at the JR East office. We were told we only had 20 minutes to find the shinkansen line when we arrived Tokyo Station which freaked us out but fortunately, it wasn’t too confusing and we asked the station staff for directions.
All the JR counter staff that served us throughout our journey were patient, friendly, and spoke decent English. If you missed your train, you don’t have to worry as you can reserve the next availability from the JR ticket office again, at no extra charge. There are bullet trains of different categories which run every half hour or less.
Once you have your tickets, you would search for line number for the platform, and then wait at the number which your carriage will stop at. There will be signages.
On the Narita Express, there are large baggage storage sections on each end of the carriage. Here, there are cables with programmable numerical locks to secure your baggage. We didn’t use the locks but we witnessed a traveler who wasn’t able to unlock the cable when she needed to disembark. She had to go find help and couldn’t get off where she needed to. A point of consideration for you.
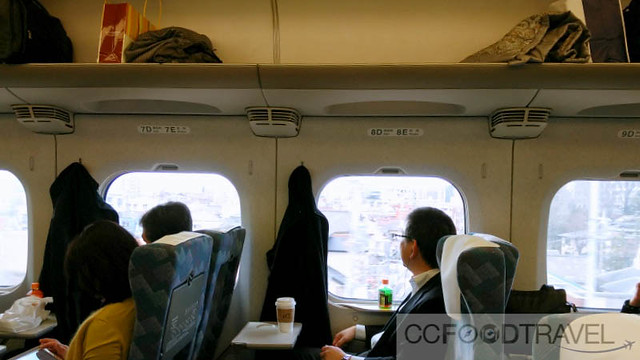
The Shinkansens do not have large baggage storage sections. Only the ones above the seat for cabin-size luggage.
Find the Narita Express Timetable here.
Find the Shinkansen Timetable here or on Hyperdia.
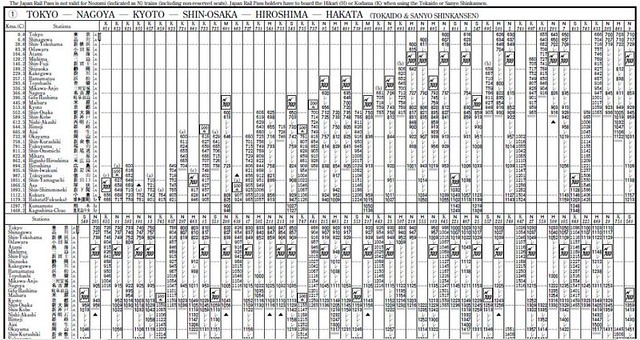
We very quickly learned how to read this Shinkansen timetable (there are several pages of this minute print) and it became easy to plan which bullet train ride would be our ticket out to the next stop. You may also pick up this schedule booklet at the JR Ticket Office. Tip: Read the schedule of Shinkansen arrival, from the place you are leaving FROM, not going TO. The way the train moves, is located in the header at the top of the page. In this instance, the bullet train is leaving from Tokyo, and heading towards, Nagoya, then Kyoto, then Osaka .. etc. The abbreviated alphabets in square boxes tells you what sort of train it is –
H – Hikari
S – Sakura
K – Kodama
N – Nozomi
While the Nozomi Shinkansen (bullet train) is the fastest, the JR Passes do not cover it, so we ended up taking usually, either the Kodama or the Hikari (2nd fastest train). Sometimes the JR Rapid Trains, another train category, are more convenient than the bullet train, and possibly just half an hour slower.
If you need to change platforms and go really far for the Shinkansen platform, you’re probably better off taking the Rapid to the same destination. All this can be checked by reading the arrival times of trains or seeking advice at the JR ticket office, since you need to pre-book your seat anyway.
Arriving in Tokyo, presented a different set of headaches. We now put away our JR Passes and got the Suica (explained below) out instead. But there are somethings one should know, to help reduce confusion when traveling in Tokyo.
1. There are multiple operators running competing lines. Japan Rail (JR) controls two of the lines, the above ground Yamanote (loop) and Chūō (central) lines.
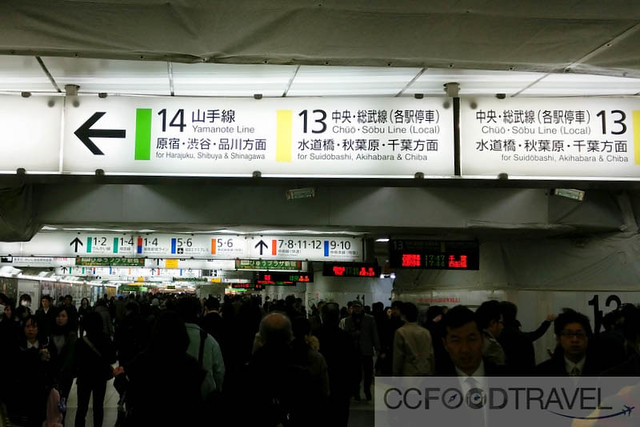
The colour-coded subway lines (13 lines) – are run by one of two operators, Tokyo Metro or Toei. There are also a handful of private lines running to the suburbs.

colorful and confusing!
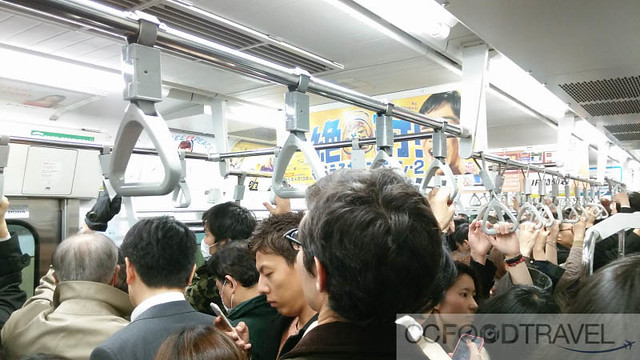
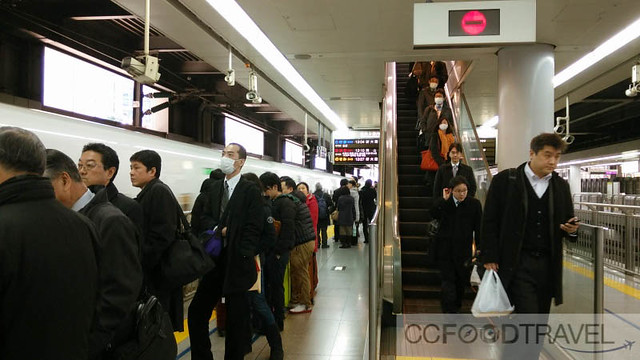
peak hour.. better not be claustrophobic
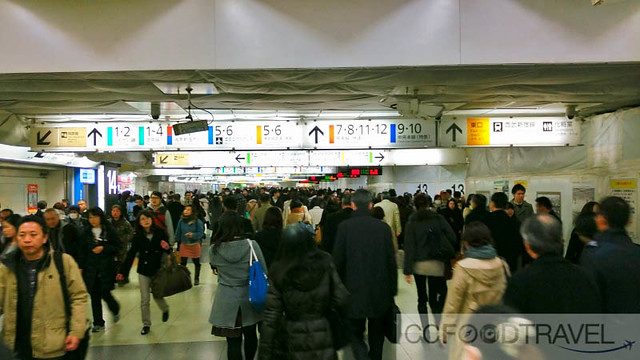
the human traffic at the stations is just mind-boggling!
2. They accept cash only at the ticket vending machines. To buy a ticket, you first need to find the destination on the map displayed above the ticket vending machines. There will be prices stated at the destination. Once you know the amount needed to pay, you select English menu at a machine then drop in the coins or slip in the notes. The machine will then display different values and you select the right amount. Change will be provided. We did encounter values stated on the machine to be in consistent will the price printed on the map. In this case, buy a ticket at the cheapest fare (¥130 for JR; ¥160 for Tokyo Metro; ¥170 for Toei) and use one of the ‘fare adjustment’ machines, near the exit gates, to settle the difference at the end of your journey. This way you won’t over pay.
3. Day passes. 1 day passes are available for subway and bus transportation around Japan. If you are using the bus or subway for a short period. This might be a good option as it is a single price for multi-use within a day.
For example, in Tokyo:
Tokyo Metro 1-Day Open Ticket costs ¥710 (child ¥360) and covers Tokyo Metro subway lines.
Common 1-Day Ticket costs ¥1000 (child ¥500) and covers both Tokyo Metro and Toei subway lines.
Tokyo Combination Ticket costs ¥1580 (child ¥790) and covers JR trains in Tokyo, all subway lines and Toei buses.
4. The convenience of Suica or Pasmo. For long term travel, another travel item you will need is an Integrated Circuit (IC) Card for moving around city railway, subway and bus lines not covered by JR. However, you can also use them for some local JR connections. You can even use it at some retail outlets. There are several IC cards but most popular are Suica, Pasmo, and Icoca. All of them are supposed to work all around Japan. You will need only one card.

Think of the IC card as a prepaid debit card with discounted rates. You would tap the card on sensors at ticket gate entry and exit points. You can reload IC card with credit at automated machines in subway stations. We used Suica (pronounced soo-ee-ka) which is purchased only from a JR station automated machine. The package starts at Y1000 (Y500 is a deposit. Y500 credit). Working the automated machine is a little challenging but you can ask for help. Suica can be returned and your balance refunded to you at a JR office at the end of your Japan tour.
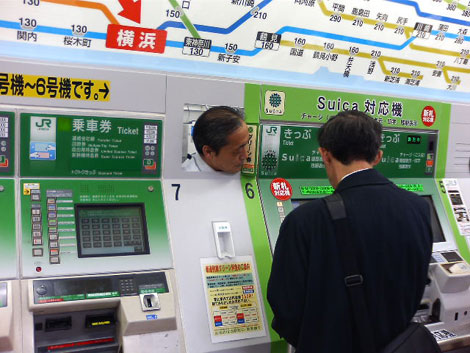
photo credit : kingant.net
This really happened to us when we had some issues with the Suica machine
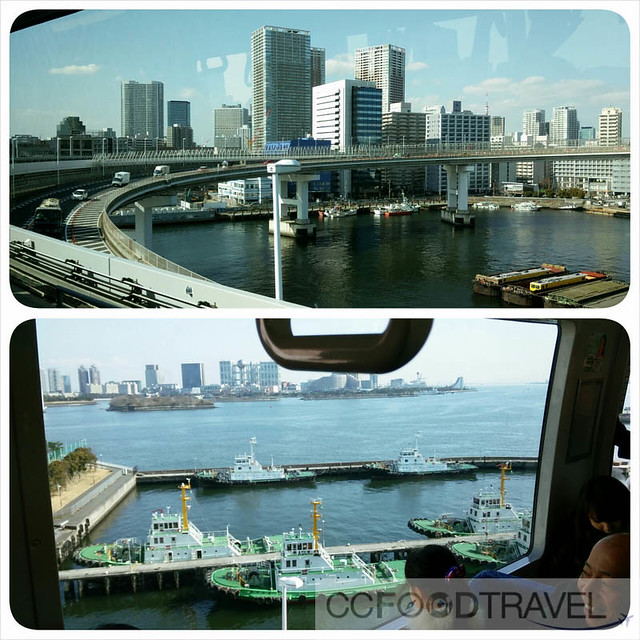
Spectacular view on the Rinkai line ride to the Tokyo Big Sight. Approx. 7-minute walk from Kokusai-Tenjijo Station..
5. Most train stations have multiple exits and multiple ticket gates. Since the underground network is so massive (e.g. Shinjuku station), it helps if you know, which exit will bring you out on the side of the street you need to get to. Otherwise you could waste at least 15 minutes getting to the right side of the road. Google Maps was very handy. While not always perfect, it saved us a lot of time.
So, with that in mind, we got through our 2 weeks in Japan without too many hiccups. We did however walk and move around so much that by the end of the trip, my limbs were ready to fall off. But was it worth it.. ? Definitely! I lost weight! 🙂
GETTING ‘CONNECTED’ IN JAPAN
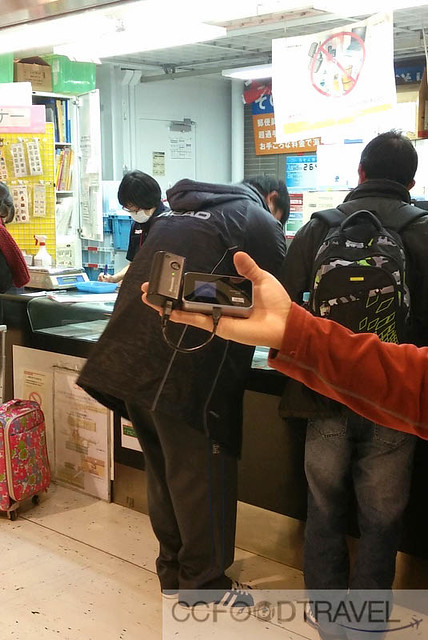
With at least 4 devices requiring connectivity, we chose a pocket WiFi hub over prepaid phone SIMs. Price wise, a hub was the better choice. We settled for eConnect‘s WiFi-To-Go package as they replied fast. The package gave unlimited data on a 4G network. Once ordered, we picked up our unit at the airport’s post office with a passport verification. The package can also be sent to any one of your hotels. For returns, the service provider included a postage-paid envelope which you can mail off at the departing airport post office.
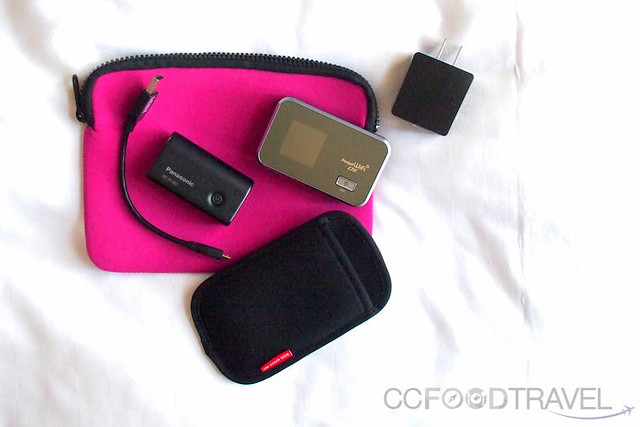
In hindsight, the hub was an excellent choice as many times over, we needed online navigation to our destinations, to verify information on the go, or when a hotel’s wifi didn’t work, we had a backup. We couldn’t rely on asking the locals as even they didn’t know some of the places we seeked, or weren’t able to communicate directions. Our hub’s network worked most of the time except at some blind spots in the subway, or when it ran out of battery. The pocket wifi lasted an average of 10 hours so that’s pretty good, and there was a separate power bank included.
Does one really need to get a prepaid SIM or pocket wifi in Japan? If you are one that’s willing to wait to get connected at your lodging or on a tight travel budget, then you won’t need one. Two of the biggest sacrificed is extra hours getting lost, and not having a language translation app ready. Besides wifi at hotels which may or may not be free, there is free wifi available at the airport, and subway/train stations but these require sign-in and sign-up conditions which can be cumbersome and the network is not always stable. You will get logged off traveling between stations.
If you are considering phone SIMs, bear in mind that Japan uses unique network bands from the rest of the world. Unlocked quad band phones might resolve this but this is not always the case. Trying to configure your phone once you arrive can be a major frustration. There are rent-a-phone services to resolve this.
Stay tuned for our next post, on 10 Things to do in Osaka!
Follow me on Instagram : @agentcikayPlease show us some FB LOVE, thank you!


Congrats by many great information, facilitate their observations to anyone who is visiting Japan
Thanks Josefina.. hope it help you with your trip! 🙂
I remember when I was in Japan many years ago, some didn’t have option for English T_T
It’s better now.. but no less confusing! 😛
is it mean suica also can be use in other city like osaka, hiroshima?
You can use Suica on almost all trains, subways and buses in MOST of Japan’s largest cities.
This will certainly be a help for my trip to Tokyo in May.
Thanks!
Awesome.. glad it helped! 🙂